A Defense-in-Depth Approach to Securing Self-Hosted Web Infrastructure (Without a VPN)
It is often necessary for homelab enthusiasts to publicly expose a web resource. Whether its meant to be a public website, an API endpoint, or a proxy, sometimes the commonly held belief of "Expose nothing, and use a VPN if you really want to access something from outside the network" is simply not feasible. In such a case, it is important to remember that exposing anything at all will significantly increase your attack surface, and thus, these resources should be locked down as much as possible. This article will discuss how to do so for free, mostly with Cloudflare's free tier products including Zero Trust network tunnels, authoritative DNS, web application firewall (WAF), and other free products like Docker Compose and any reverse proxy.
A Note on Privacy
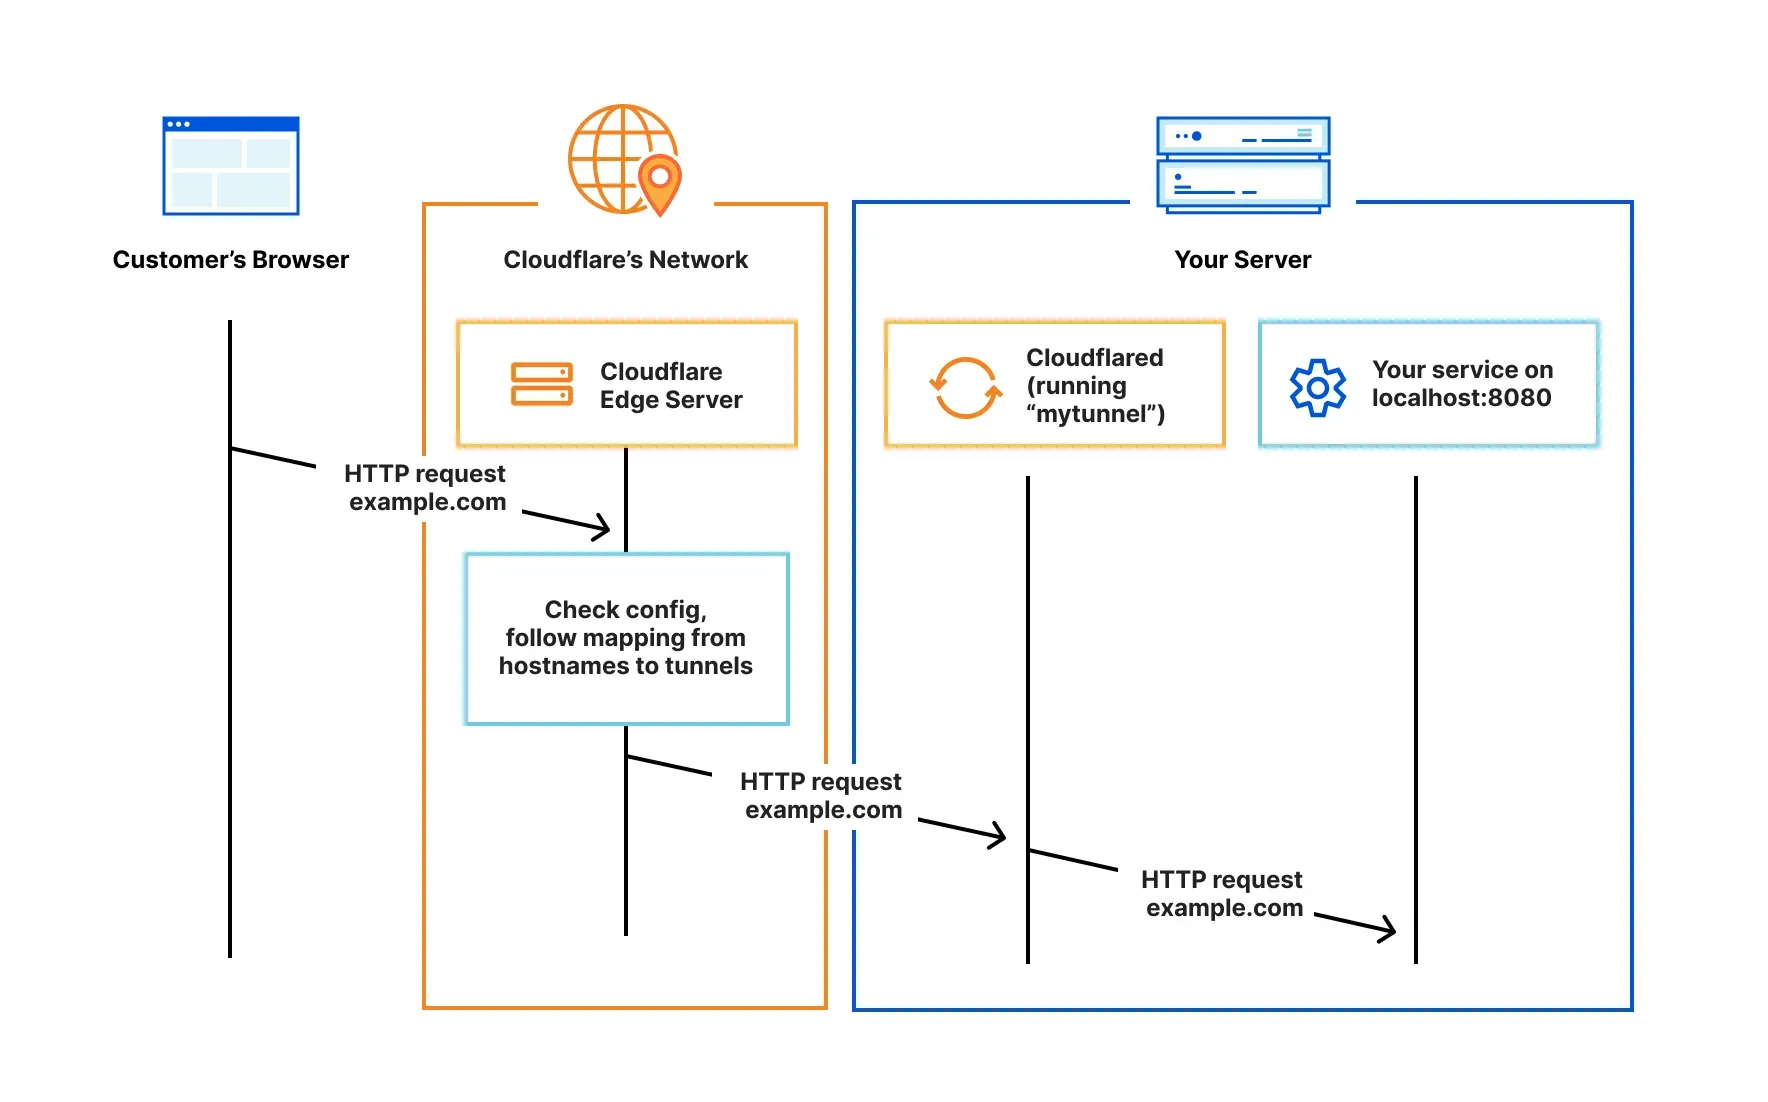
Because this approach uses Cloudflare Tunnels (formerly Argo tunnels) to serve HTTP(S) traffic, various privacy concerns could be raised. When you use a Cloudflare Tunnel, Cloudflare terminates TLS connections at its edge. This means that Cloudflare is essentially acting as a "Man-in-Middle", with data being encrypted in transit from the Client to Cloudflare, then decrypted by Cloudflare's point of presence (PoP). At this stage, Cloudflare is inspecting the traffic for DDoS mitigation, caching, WAF scanning, bot challenging, etc. Afterwards, the data is re-encrypted and sent over the tunnel to the origin server. Unfortunately, Cloudflare does not offer granular controls to the customer in terms of how these actions are logged. These are all desirable actions for enhancing security, but for some individuals, trusting a third party with unencrypted data can introduce valid privacy (or even compliance) concerns.
For most small-scale homelab purposes, the benefits of using Cloudflare Tunnels outweigh the potential privacy concerns, but everyone's situation is different. These tunnels simplify the deployment of web resources (for reasons you'll see later), greatly enhance security, and improve performance by virtue of using Cloudflare global content delivery network (CDN).
How a Cloudflare Tunnel Works
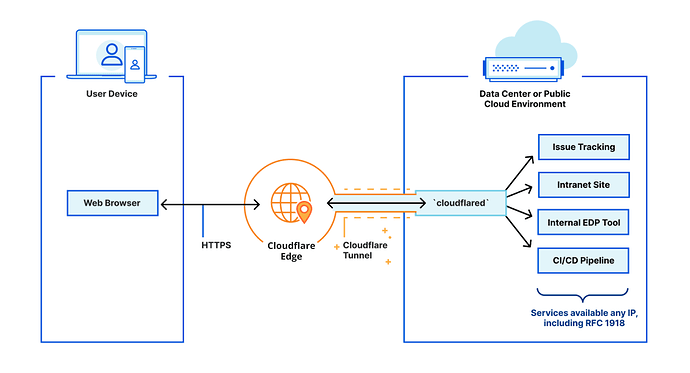
When you install a Cloudflare tunnel somewhere within your infrastructure (using the cloudflared connector), you're installing a lightweight tunnel daemon that creates an encrypted outbound connection to Cloudflare's edge. This will mask the origin server's IP address and makes it an appealing option for those behind CG-NAT. It also protects you from attacks that bypass Cloudflare, because the DNS configuration ensures that all traffic to your resources must go through Cloudflare. Because it doesn't listen for incoming connections, you don't have to open any ports on your firewall. This is the main advantage of using a tunnel over a traditional reverse proxy setup. Additionally, you can use a tunnel to proxy other types of traffic (Not just 'web' on ports 443 or 80) like SSH, RDP, and SMB.
Internal Infrastructure
Effectively securing your public web resources starts within the origin server. This deployment setup assumes you're using a single "node", with a Docker (or better Docker Compose) environment to host the applications. We will also be using the 'cloudflared' connector to deploy the tunnel.
Networking
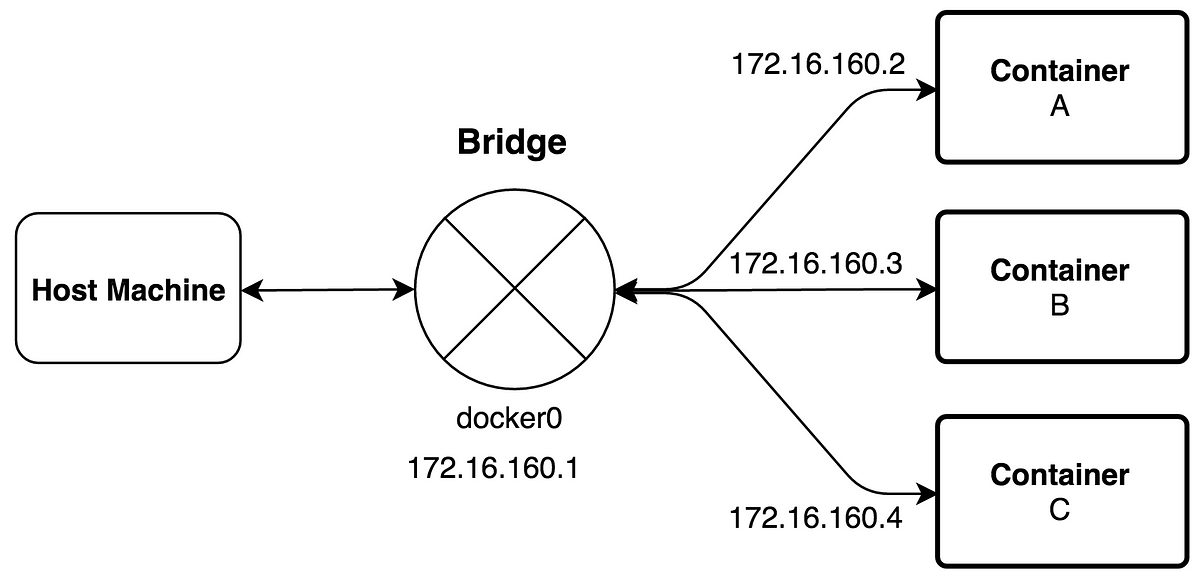
For a simple but effective setup (one without introducing other complexities like VLANs and internal DNS which you may not have the hardware to support), we can create a custom Docker network using the bridge network driver. Within a container's individual network namespace, the bridge driver attaches one veth (virtual Ethernet) interface to the container, and the other to the docker0 bridge on the host. Thus, containers on a bridge network can reach the outside world through network address translation (NAT), only if ports are explicitly published. If no ports are published, external entities cannot directly connect to the container, but the container itself can initiate outbound connections. Docker automatically updates the iptables rules of the host to manage this. By default, containers on the same bridge network can communicate with each other, but not with containers on other bridge networks. The bridge driver is part of the host's network namespace. Because of this, containers will share the host's network stack. This isn't ideal for pure isolation, but it is generally robust enough for this application. If more traditional isolation is desired, you can use the macvlan network driver, which allows containers to appear as physical devices on the network, enabling containers to directly communicate with the local Layer 2 network. This will give you more options in terms of isolating the containers, but advanced setups that employ VLANs will require a compatible firewall/switch.
Create a Docker bridge network on the host:
docker network create \
    --driver bridge
    --subnet 192.168.10.0/24
    --gateway 192.168.10.1
    proxy_net
Note that you can use whatever subnet you want. If you don't specify a gateway, Docker's IP Address Management (IPAM) system will automatically determine one.
Inspect the newly created network:
docker network inspect proxy_net
Reverse Proxy
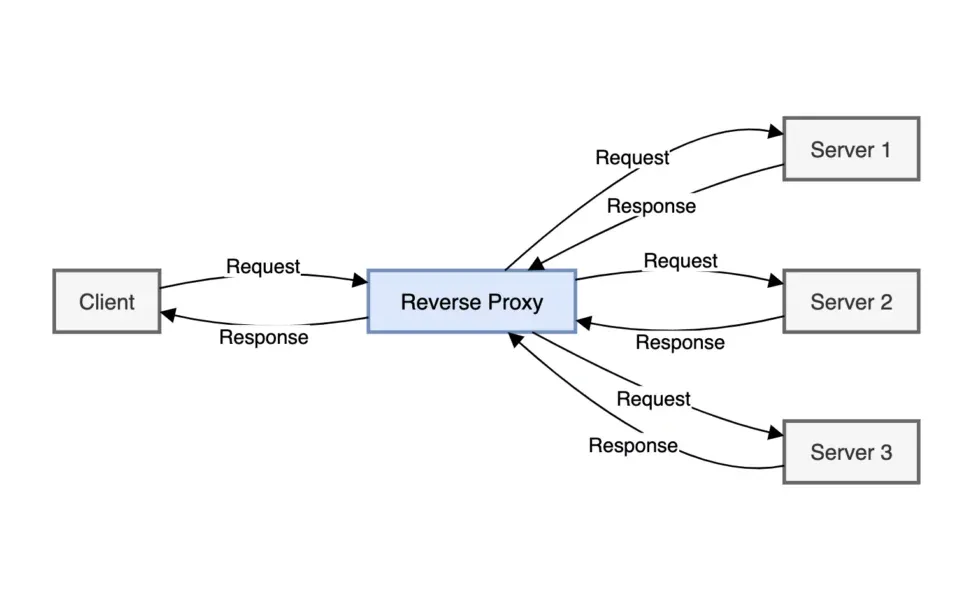
It's a good idea to use a reverse proxy in front of each application you plan to expose. Which one you use (NGINX, Traefik, SWAG, etc) is up to you, and this article won't go in-depth on installing one, but it will assume that you have one.
Using a reverse proxy will allow easier SSL management by providing a single point of termination for your certificates. Many proxies also provide additional security tools such as rate limiting, access control lists (ACLs), and centralized logging.
Other Security Measures
Keep in mind what the goal is: Securing self-hosted public web traffic. This article only goes over securing the infrastructure that supports doing so. You also have to keep in mind that the applications themselves may be vulnerable. To mitigate this, you shouldn't expose anything you don't have to (think about if multiple people need access to something, or just yourself. If only you need occasional access while off the network, consider using something like Tailscale or a VPN.), and you should implement additional authorization.
Adding something like Authelia to this setup can provide a central point for enforcing SSO, MFA, and basic authentication. This can help protect certain applications that not everyone should have access to, and allow you to more granularly control who has access to what.
Tunnel Deployment
The first step is to obtain a token to run the tunnel connector. Using the interface on one.dash.cloudflare.com, select "Tunnels" under the Networks section, and create a new tunnel using the cloudflared connector. On the "Install and run connectors" page, copy the token from the command provided.
To simplify deployment and keep everything tidy, we will use Docker Compose to install the tunnel somewhere in the Docker network created beforehand. Create a new docker-compose.yml file in a fresh directory:
services:
    cloudflared:
        image: cloudflare/cloudflared:latest
        container_name: cloudflare_tunnel
        restart: unless-stopped
        command: tunnel run
        environment:
            TUNNEL_TOKEN: "<token>"
        networks:
            proxy_net:
                ipv4_address: <IPv4 address>
networks:
    proxy_net:
        external: true
Bring the tunnel up by running:
docker-compose up -d
If no errors occurred, you should be able to see the tunnel up and listed as "HEALTHY" on the Cloudflare One dashboard.
External Infrastructure
Tunnel Configuration
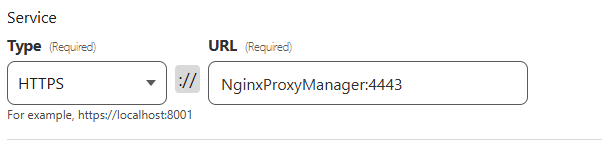
Exposing your HTTP resources with a Cloudflare Tunnel is configured via a Public Hostname. For basic configurations, you'll only need one. Create a new public hostname using the * wildcard as the subdomain. Set the 'Type' to HTTPS, and enter the hostname of your reverse proxy and its port separated by a colon. Since your proxy and the tunnel should be on the same Docker network, you don't have to use its IP address. Make sure the port matches the proxy's internal HTTPS port (not the external Docker port if you have it mapped).
Because we used a wildcard subdomain, Cloudflare didn't automatically create a new DNS record for the tunnel. By default, Cloudflare will route traffic to the tunnel by finding a DNS record that matches the UUID of the tunnel you're configuring. Create a new record:
Log in to the Cloudflare dashboard, select your domain, and go to DNS > Records. Add a new CNAME, setting the target to <UUID>.cfargotunnel.com. The UUID of your tunnel is listed under "Tunnel ID" on the Cloudflare One dashboard.

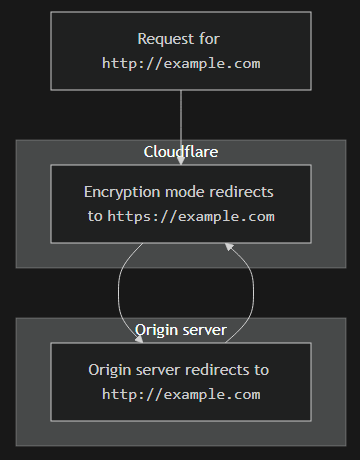
Now, the part a lot of people get wrong when configuring a tunnel: We can enforce strict end-to-end SSL very easily. Granted, this isn't as important because these settings only affect how the tunnel connects to your internal resources, but this is a "Defense-in-depth" approach after all.
Back on the Public Hostnames page, under Additional Application Settings > TLS, enter your domain name in the "Origin Server Name" field and ensure that "No TLS Verify" is OFF. These settings expect that your origin server's SSL certificate is valid and its name is your domain. Leaving "No TLS Verify" on will tell Cloudflare to skip certificate checks against the origin.
Ensuring that we have full SSL verification every step of the way isn't just good for checking boxes; it also prevents a potential redirect loop issue that could occur if your internal services expect an HTTPS connection and you're using the Full (Strict) SSL encryption mode in Cloudflare. In your reverse proxy configuration, make sure that the scheme is http (the applications themselves don't have SSL certificates; that's what the reverse proxy is for) for each host, and enable force SSL and HSTS.
DNS Configuration
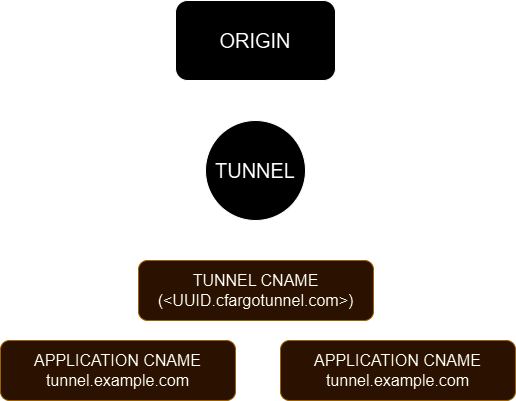
If you have multiple resources to expose, you can configure your DNS records to use the same tunnel for each of them. Simply create a new CNAME and point it to the CNAME you made earlier for the tunnel:

With your DNS properly configured (each CNAME record being proxied via Cloudflare), you get the added benefit of your origin server's IP being obscured even more, because if someone were to get one of your CNAME records, it would just create a loop that points back to the tunnel itself.
Web Application Firewall
The Cloudflare free tier provides your domain with a zone-level WAF with support for up to 5 custom rules, and 1 rate limiting rule. If you're protecting an website or API endpoint, these can be useful for finely tuning access and rate limiting rules at the Cloudflare edge. For example, you could use a custom rule to implement a geoblock and only allow traffic from certain countries.
On the Cloudflare dashboard, select your domain and navigate to WAF under the Security tab. This is where you can define custom rules and tell Cloudflare what action to take if a rule is matched. Offloading this to Cloudflare (instead of on a dedicated WAF or your reverse proxy) can help speed things up.

Conclusion
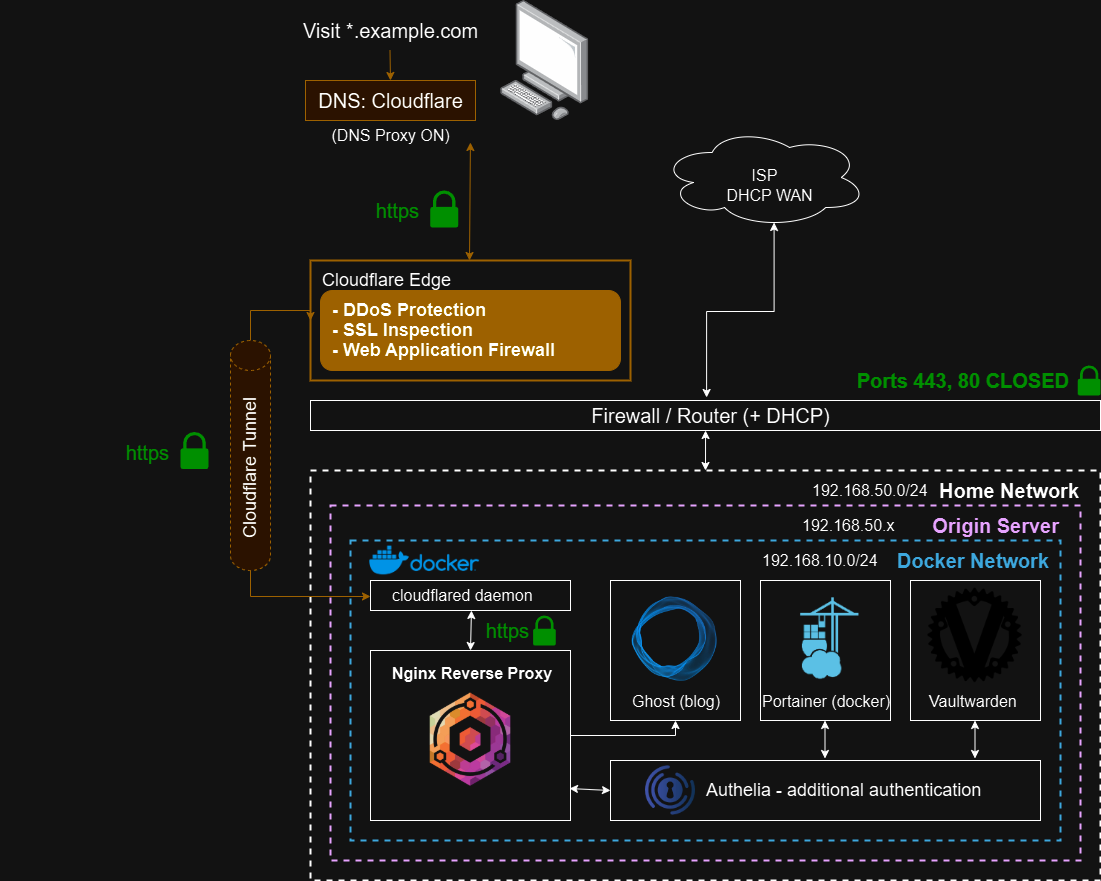
If all went well, your self-hosted infrastructure with exposed HTTP resources should now be effectively secured in a scalable way completely for free. Always remember to approach security from every angle. This post didn't go in-depth on other security measures to take, but it provides a solid basis for at least getting your applications exposed. Here is a sample network diagram that uses what was discussed in this article: